

Dual Booting Slax Linux and BartPE (Windows) from a USB Thumbdrive (UFD)
Update 11/30/2006: Check out the video version of this article: http://www.irongeek.com/i.php?page=videos/backtrack-bartpe-dual-boot
While I was researching for my PhreakNIC X presentation on Bart's PE Builder I began to play around with booting it from a USB Thumbdrive (Also know as a USB Flash Drive - UFD). In the process, I began to wonder if you could dual boot it with Slax Linux to make a very handy recovery system you could carry around in your pocket. I found Thibeact's notes on the 911 CD forums ( http://www.911cd.net/forums//index.php?showtopic=10806&st=220&p=98227&#entry98227 ) and modified them to fit my needs.
What follows are the basic steps for dual booting Slax Linux and BartPE from a simple USB flash drive. I find this very useful for changing password, removing spyware and doing various other security related tasks. Check out my PhreakNIC presentation before you begin so understand the basics of using Pe Builder (Creating a Windows Live CD for System Recovery and Pen-Testing with Bart's PE Builder) then follow these steps to dual boot it with Slax using a Windows XP system to install everything:
1. First, download, install and run MySlax on your Windows PC. You can obtain MySlax from:
2. Once you have MySlax running choose the ISO-Default radio button, choose the Slax based ISO you wish to use, click the "Mount" button then hit the "USB Stick" button. You should be able to use any Slax based ISO as your source, including normal Slax, BackTrack or Slast.

3. Click the "Create USB Stick" button, then when the format dialog comes up make sure you choose FAT (not FAT32) and click start. The UFD must be formatted as Fat16 for BartPE to work right in the later steps.

4. Click "Next" and MySlax will being putting the need files to boot Linux onto the UFD (USB Flash Disk). When it finishes confirm its completion by click the "Success" button.
5. Now would be a good time to make sure you have a valid Pe Build to use. Start Pe Builder, set the media output to none since we won't be building a normal CD ISO, then click the "Build" button.

6. Once PE Builder is done building your system, drop out to a command line, go into your Pe Builder install directory and issue the command "pe2usb.cmd <USB-Drive-Letter>" where <USB-Drive-Letter> is whatever drive letter your UFD is mount as. In my case that's F:.

7. Next, edit syslinux.cfg in the root of your UFD and paste in the following contents:
| default vesamenu.c32 prompt 0 timeout 0 F1 splash.txt F2 splash.cfg SAY Type "bartpe" for Bart's Pe, or type "slax" for Slax. DISPLAY syslogo.lss MENU TITLE Irongeek's Boot UFD MENU BACKGROUND mascot.png label slax menu label Slax kernel vmlinuz append max_loop=255 initrd=initrd.gz vga=0x317 maxcpus=1 init=linuxrc load_ramdisk=1 prompt_ramdisk=0 ramdisk_size=4444 root=/dev/ram0 rw label bartpe menu label Bart's PE kernel pe2usb.bss #label cluster # kernel vmlinuz # append max_loop=255 initrd=initrd.gz vga=0x317 maxcpus=1 init=linuxrc load_ramdisk=1 prompt_ramdisk=0 ramdisk_size=4444 root=/dev/ram0 rw #label btdc # kernel vmlinuz # append max_loop=255 initrd=initrd.gz init=linuxrc load_ramdisk=1 prompt_ramdisk=0 ramdisk_size=4444 root=/dev/ram0 rw #label memtest # kernel memtest |
The syslinux.cfg file tells SysLinux (the boot loader) how you want things set up. I based mine on the BackTrack syslinux.cfg file. Take a look at the SysLinux documentation if you want to change things around. The line "MENU BACKGROUND mascot.png" lets me use the following PNG as my background at the boot prompt:

You may want to copy the above image to the root of your USB drive, or make a PNG of your own to use. As long as it's a 640x480 PNG named mascot.png it should work fine with my syslinux.cfg.
8. Download Bart's mkbt.exe from:
http://www.nu2.nu/mkbt/
and place it at the root of your UFD. We will be using this tool later to fix the boot sector of the UFD.
9. Copy pe2usb.bin from the root of your PE Builder install (c:\pebuilder3110a in my case) to the root of your UFD and renamed it to pe2usb.bss. This step is very important, the bss extention must be there so SysLinux knows what sort of kernel/boot sector it is.

10. While Slax comes with a version of SysLinux, I prefer to download it myself and use a few extra tools to make things prettier. You can download SysLinux from:
http://www.kernel.org/pub/linux/utils/boot/syslinux/
I chose the syslinux-3.31.zip archive. Once you have the archive downloaded extract the files \win32\syslinux.exe and \com32\modules\vesamenu.c32 then place them in the root of your Thumbdrive.
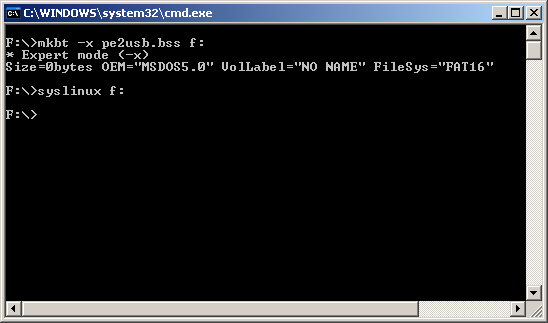
11. Go to a command prompt, change to your UFD's drive letter and then issue the commands:
mkbt -x pe2usb.bss <USB-Drive-Letter>
syslinux
<USB-Drive-Letter>
as seen in the screen shot below:
12. Now you can reboot the system and try to boot from your thumbdrive. Your BIOS must support booting from USB, so it's won't work on all systems.
A quick side note, one of the great things about Slax is how easy it it to add extra software. Just download the modules you want from http://www.slax.org/modules.php and put them in the modules folder on your UFD.

I hope that this tutorial was helpful to you. If you think I should make a video on this topic just email me and ask.
 Printable version of this article