Building a Svartkast with a pretty pink Pogoplug: Cheap hardware to leave
on someone else's network
Building a Svartkast with a pretty pink Pogoplug: Cheap hardware to leave on
someone else's network
(read the sequel
Running an I2P Svartkast on the Raspberry Pi: Even more cheap hardware to leave
on someone else's network)
 The first obvious question is what the hell is a Svartkast? Well, it’s a term I picked up from Telecomix. Before I would have just referred to it as a “drop box” (too much name collision there now), but some also call it a kamikaze box or a Blackthrow (which is English for the Swedish term Svartkast). The core idea is to have a cheap host you can leave on someone else’s network that you can remote into but that can’t easily be tied back to you. The Svartkast does this one better by using a cipher-space like Tor or I2P to further obfuscate where communications to the box are coming from (though slowing down communications of course, anonymity isn’t “free”). While there are a lot of options for hardware,
from old laptops to Mini-ITX, I went with the Pogoplug because one can be had
for $50 and if it’s lost in action, so be it. It has built in gigabit Ethernet,
4 USB plugs, 256MB of RAM and a Marvell Kirkwood 1.2GHz ARMv5te CPU. Feel free
to take off the pink shell to make it smaller and less obvious, but be careful
of the exposed parts on the power supply. Future plans are to use a Raspberry Pi
when it becomes available. A legitimate pen-tester would probably want to skip
the cipher-space part as it just slows things down, and I’m only recommending
the Blackthrow component for those that live under repressive governments.
Still, I think it’s a fascinating concept.
The first obvious question is what the hell is a Svartkast? Well, it’s a term I picked up from Telecomix. Before I would have just referred to it as a “drop box” (too much name collision there now), but some also call it a kamikaze box or a Blackthrow (which is English for the Swedish term Svartkast). The core idea is to have a cheap host you can leave on someone else’s network that you can remote into but that can’t easily be tied back to you. The Svartkast does this one better by using a cipher-space like Tor or I2P to further obfuscate where communications to the box are coming from (though slowing down communications of course, anonymity isn’t “free”). While there are a lot of options for hardware,
from old laptops to Mini-ITX, I went with the Pogoplug because one can be had
for $50 and if it’s lost in action, so be it. It has built in gigabit Ethernet,
4 USB plugs, 256MB of RAM and a Marvell Kirkwood 1.2GHz ARMv5te CPU. Feel free
to take off the pink shell to make it smaller and less obvious, but be careful
of the exposed parts on the power supply. Future plans are to use a Raspberry Pi
when it becomes available. A legitimate pen-tester would probably want to skip
the cipher-space part as it just slows things down, and I’m only recommending
the Blackthrow component for those that live under repressive governments.
Still, I think it’s a fascinating concept.
Let’s Get Linux On It
Since we are talking about some pretty low end ARM hardware we are not going
to be running Windows on it. :) Lucky, the Pogoplug comes with it’s own version
of Linux, which we can replace with a version of Debian Linux. Jeff Doozan has
provided some scripts and instructions for getting it installed on his site:
http://jeff.doozan.com/debian/
I’ve copied and pasted from some of his command lines, with a bunch of my own
commentary spliced in.
1. First you will need to know the IP of your Pogoplug so you can SSH into it.
Easiest way to do this is while you are configuring it on a network you control
take note of the MAC address (printed on the bottom) of your Pogoplug, then look
for it’s IP on your router.
2. You may have to open up its web interface first to enable SSH support, and
it’s been so long since I’ve had an unhacked Pogoplug I can’t tell you exactly
where that option is (Google away for it if you can’t find it).
3. Once you have the SSH service running you should be able to login as root
with the default password ceadmin.
4. Insert a formatted (or at least non bootable) thumb drive into one of the
free USB ports.
5. Let’s partition the drive, the following commands (highlighted in green) are
what I used on my 4GB flash drive. You may want to change them a little to match
your needs.
------------------------------------
login as:
root
root@192.168.1.124's password:
Pogoplug:~$
fdisk /dev/sda
Command (m for help):
m
Command Action
a toggle a bootable flag
b edit bsd disklabel
c toggle the dos compatibility flag
d delete a partition
l list known partition types
n add a new partition
o create a new empty DOS partition table
p print the partition table
q quit without saving changes
s create a new empty Sun disklabel
t change a partition's system id
u change display/entry units
v verify the partition table
w write table to disk and exit
x extra functionality (experts only)
Command (m for help):
o
Building a new DOS disklabel. Changes will remain in memory only,
until you decide to write them. After that the previous content
won't be recoverable.
Warning: invalid flag 0x00,0x00 of partition table 4 will be corrected by w(rite)
Command (m for help):
n
Command action
e extended
p primary partition (1-4)
p
Partition number (1-4):
1
First cylinder (1-1018, default 1):
1
Last cylinder or +size or +sizeM or +sizeK (1-1018, default 1018):
800
Command (m for help):
n
Command action
e extended
p primary partition (1-4)
p
Partition number (1-4):
2
First cylinder (801-1018, default 801):
<enter>
Using default value 801
Last cylinder or +size or +sizeM or +sizeK (801-1018, default 1018):
<enter>
Using default value 1018
Command (m for help):
p
Disk /dev/sda: 4040 MB, 4040724480 bytes
125 heads, 62 sectors/track, 1018 cylinders
Units = cylinders of 7750 * 512 = 3968000 bytes
Device Boot Start End Blocks Id System
/dev/sda1 1 800 3099969 83 Linux
/dev/sda2 801 1018 844750 83 Linux
Command (m for help):
w
The partition table has been altered!
Calling ioctl() to re-read partition table
Pogoplug:~$
------------------------------------
6. Once the partitions are set up, we can use Jeff Doozan’s scripts to install
Debian Squeeze onto the flash drive. Run the following command, or just copy and
paste them into your SSH session (Copied from Jeff’s page linked to above):
------------------------------------
cd /tmp
wget http://jeff.doozan.com/debian/dockstar.debian-squeeze.sh
chmod +x dockstar.debian-squeeze.sh
export PATH=$PATH:/usr/sbin:/sbin
./dockstar.debian-squeeze.sh
<at this point, all you should have to do is ok at the script confirmation>
ok
------------------------------------
After the above steps, the password is now “root” (please change that on first
boot with the command passwd). We now should have Debian on our little pink
buddy (not that one you perv!).
Next up, lets install some useful apps.
At this point you should have a nice little computer that can be used as a drop
box. Install whatever you might normally want on such an item, pretty much if
it’s in Debian’s repositories you can install it with easy (think of the
pen-test options). The rest of the article will focus on the darknet/anonymity
aspects. The next step will be to grab a bunch of packages that will be useful
for the following steps. We can pretty much do this with one command:
------------------------------------
apt-get install lxde iceweasel xfonts-base xrdp tightvncserver nano cron
------------------------------------
Here are the things we are installing, and why:
default-jre: Java Runtime, but on the Pogoplug this IceTea version is a little
too slow. We will need to replace it with the Oracle/Sun version of Java.
lxde: A relatively light weight desktop environment.
iceweasel: The Debian version of FireFox.
xfonts-base: Needed by some of the other apps.
xrdp: This is so you can use a Windows Remote Desktop client to connect to the
Blackthrow and use GUI tools. Keep in mind GUI access will be slow even with a
direct connection, over a darknet it will likely be unusable.
tightvncserver: Another option for GUI access.
nano: My favorite text editor, because I’m lame like that.
cron: This is for scheduling jobs, but I use it as a ghetto way to keep the I2P
daemon running.
Installing Java so I2P can function
If you are using hardware other than the Pogoplug you may be able to skip this
step. For the Pogoplug default-java may not be enough, so we have to do the
following.
1. Let’s Wget the Oracle/Sun Embedded Java package. You will likely have to
replace the URL with an updated one. Check out possible links by looking for the
most current “ARMv5 Linux - Headless” download at http://www.oracle.com/technetwork/java/embedded/downloads/javase/index.html
------------------------------------
wget http://download.oracle.com/otn-pub/java/ejre/7-b147/ejre-7-fcs-b147-linux-arm-sflt-headless-27_jun_2011.tar.gz
------------------------------------
2. Now we can untar the download.
------------------------------------
tar -zxf ejre-7-fcs-b147-linux-arm-sflt-headless-27_jun_2011.tar.gz
------------------------------------
3. To make sure our special Oracle/Sun Embedded Java is in the path edit:
/etc/profile
and add:
/root/ejre1.7.0/bin
to the path. Use Nano or Vi to make the edits. The lines should look something
like this after editing:
if [ "`id -u`" -eq 0 ]; then
PATH="/root/ejre1.7.0/bin:/usr/local/sbin:/usr/local/bin:/usr/sbin:/usr/bin:/$
else
PATH="/root/ejre1.7.0/bin:/usr/local/bin:/usr/bin:/bin:/usr/local/games:/usr/$
fi
export PATH
At this point you may want to logout and back in to make sure the path is set.
4. Run:
------------------------------------
java -version
------------------------------------
and hopefully it should say something like:
Java SE for Embedded 7 (Build 147) ARMv5 Linux - Headless, EABI, Soft Float,
Little-Endian
Installing I2P
Since I2P is the cipherspace we will be using, we need to install it (duh!).
1. Find the URL to download from by going to
http://www.i2p2.de/download,
this will change with time as new versions are released. At the time of this
writing the following works.
------------------------------------
wget
http://mirror.i2p2.de/i2pinstall_0.8.8.exe
------------------------------------
Yes, that was an EXE we just downloaded to an ARM Linux box, we meant to do
that.
2. Next, to install I2P use the following command:
------------------------------------
java -jar i2pinstall_0.8.8.exe -console
------------------------------------
3. Take all the defaults. I put mine in a directory called just i2pbin. Keep in
mind that i2pbin is the directory where the binaries for I2P are but the active
configs will be in root’s home under .i2p (note the leading period).
4. In theory, if we are in root’s home we should be able to use the command:
------------------------------------
i2pbin/i2prouter start
------------------------------------
But this does not seem to work on the ARM platform. Use this instead:
------------------------------------
i2pbin/runplain.sh
------------------------------------
Now we should have the directory /root/.i2p/ where our configs will be. For
simplicity (the damnable enemy of security) I’m running all of this as root, but
ideally you may want to make a special account to run it from. Hey, it’s meant
to be throwaway hardware anyway. In the case of making a non-root account to run
it from put the Java and I2P binaries in a more accessible directory and modify
the paths in these instructions accordingly.
5. For step 6 to work, we need to modify the start up script. For that we will
copy it to a new file, then edit that file:
------------------------------------
cp i2pbin/runplain.sh i2pbin/myrunplain.sh
nano i2pbin/myrunplain.sh
------------------------------------
Right below the line that reads #!/bin/sh, add:
PATH=/root/ejre1.7.0/bin:$PATH
export PATH
This is so our special Java is in cron’s path.
6. Now the problem with this is making sure it’s running at all times, even
after a crash. The following is my solution, but there may be a better way. Run:
------------------------------------
crontab -e
------------------------------------
This should bring up an editor so we can add scheduled tasks. Add the following
lines:
0 * * * * /root/i2pbin/myrunplain.sh
@reboot /root/i2pbin/myrunplain.sh
then exit. These lines should start up I2P on boot and try to load it every
hour. The reason for the every hour line is to restart I2P in case it has
crashed. If I2P finds that it is already running, it should graceful close.
7. We should now have I2P up and running.
Extra I2P Tweaks
For a full list see
http://www.irongeek.com/i.php?page=security/i2p-tor-workshop-notes
These are just some useful items. Note that we have the core binaries in the
directory “/root/i2pbin”, but the config files are in “/root/.i2p”
1. Let’s make it so we can get into the web console from any box, not just the
local host. Edit .i2p/clients.config and look for a line that looks like:
clientApp.0.args=7657 ::1,127.0.0.1 ./webapps/
and set it to:
clientApp.0.args=7657 0.0.0.0 ./webapps/
2. If we do step one, it is probably a good idea to make a router password. Just
edit .i2p/clients.config
------------------------------------
nano .i2p/clients.config
------------------------------------
then add the line:
consolePassword=SomePassword
Obviously replacing “SomePassword” with the password you want to use. The logon
name is “admin”.
3. If you have done step 1 above, you may also want to open up I2P’s web proxy
to the rest of the LAN as well.
a. Go to the web interface at http://<ip of pogoplug>:7657/
b. Click through to I2PTunnel, then the “Name: I2P HTTP Proxy” settings.
c. In the Access Point->Reachable Dropdown, set it to 0.0.0.0 if you wish.
0.0.0.0 means it will listen on all configured IPs.
You may also be able to do the above by just directly editing
.i2p/i2ptunnel.config.
4. If too many resources are being taken by routing for others, you may wish to
add:
router.maxParticipatingTunnels=0
to your .i2p/clients.config. Sharing is good for the network, but the Pogoplug
is a little under powered to be of that much help to others perhaps.
5. To make our changes take effect we may have to stop and restart I2P. To do
this, we can just use this command to stop I2P:
------------------------------------
kill `cat /tmp/router.pid`
------------------------------------
Please note those are back ticks (~ key), not single quotes. To start it again
we can just use:
------------------------------------
/root/i2pbin/i2prouter start
------------------------------------
Setting up access over the Darknet
Of course to make it a working BlackThrow you would need something more to
access it remotely. You could go to the extreme and use Garlicat
(http://www.cypherpunk.at/?p=40)
but for simplicity I’m just using OpenSSH. OpenSSH is already installed, fairly
low bandwidth is required for just remote shell access and you can use dynamic
port forwarding over SSH to make it act as a poor man’s VPN/anonymising proxy.
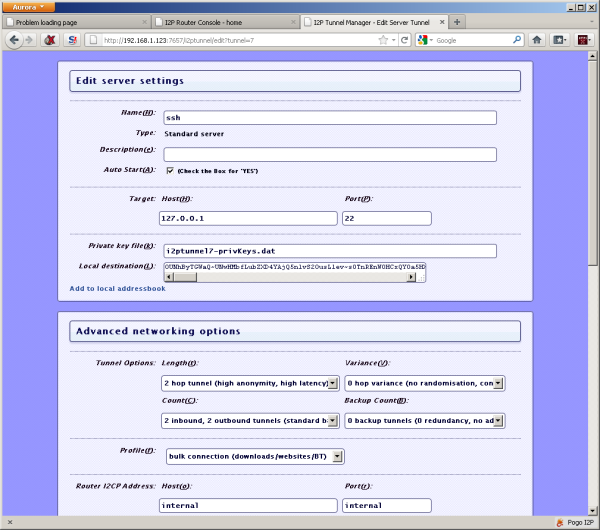
1. On the server’s install of I2P (the Pogoplug) go into the console and make a
Standard server tunnel and point it to port 22 on 127.0.0.1. Also make sure you
enable “Auto Start”, no other settings should need to be changed. After you
start the server tunnel for the first time make note of the Base32 address.
2. On the client’s install of I2p make a client tunnel with a port of your
choosing (I used port 22 for consistency), reachable by 127.0.0.1, and insert
the Base32 address you found above into the “Tunnel Destination(T):” field.
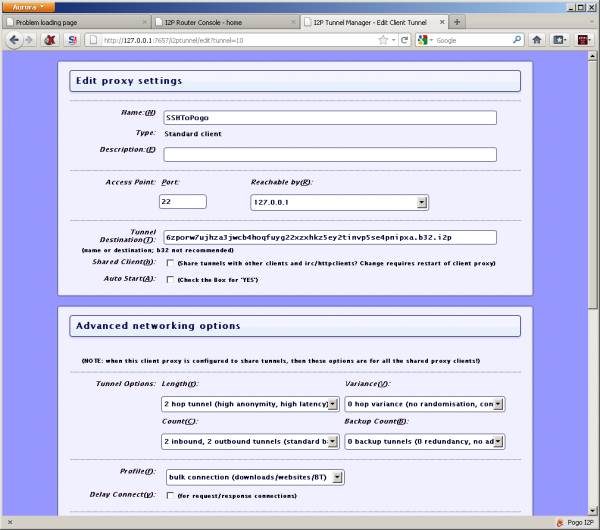
3. Now you should be able to SSH and dynamic port forward into the Pogoplug.
And that’s it. If you can, set up port forwarding on the NAT router, but the
default UDP hole punching behavior should be sufficient. Hopefully these notes
are enough for someone with a little experience with Linux and SSH to be able to
get a Svartkast up and running. If not, the following may help:
As for how to use dynamic port forwarding, check out
http://www.irongeek.com/i.php?page=videos/sshdynamicportforwarding
My notes on I2P and Tor, hope these are helpful
http://www.irongeek.com/i.php?page=security/i2p-tor-workshop-notes
For an intro to I2P see my section of these talks
http://www.irongeek.com/i.php?page=videos/shmoocon-firetalks-2011
Getting started with the I2P Darknet in Windows
http://www.irongeek.com/i.php?page=videos/getting-started-with-the-i2p-darknet
Installing the I2P darknet software in Linux
http://www.irongeek.com/i.php?page=videos/getting-started-with-the-i2p-darknet
Hosting Hidden Services in I2P: eepSites and SSH
http://www.irongeek.com/i.php?page=videos/i2p-darknet-hidden-servers
Darknets and hidden servers:Identifying the true IP/network identity of I2P
service hosts
http://www.irongeek.com/i.php?page=security/darknets-i2p-identifying-hidden-servers

