| |||||
|
| |||||
|
Search Irongeek.com:  
Help Irongeek.com pay for bandwidth and research equipment: |
Running an I2P Svartkast on the Raspberry
Pi: Even more cheap hardware to leave on someone else's network This is sort of a sequel to a
previous article I wrote titled "Running an I2P Svartkast on the Raspberry Pi:
Even more cheap hardware to leave on someone else's network". In that article I
answer the obvious question of what the hell a Svartkast is, as well as show how
to make one out of a Raspberry Pi. The short explanation is that a Svartkast is sort
of like a Dropbox/Pwn Plug but with a darknet component like Tor or I2P.
Svartkast is a term I picked up from Telecomix. Before I would have just
referred to it as a “drop box” (too much name collision there now), but some
also call it a kamikaze box or a Blackthrow (which is English for the Swedish
term Svartkast). The Pogoplug was about $50, the Raspberry Pi is $35, has some
better hardware and should be more readily available in a few months after the
rush dies down. Raspberry Pi Stats bogarded from Wikipedia: Developer Raspberry Pi Foundation Let’s Get Linux On It This part is way easier than with
the Pogoplug. For my testing I'm using the
Debian “wheezy” public beta
(2012-06-18-wheezy-beta). Rather than tell you how to install it, I'd rather
point you to their notes:
http://elinux.org/RPi_Easy_SD_Card_Setup I used Win32DiskImager on a
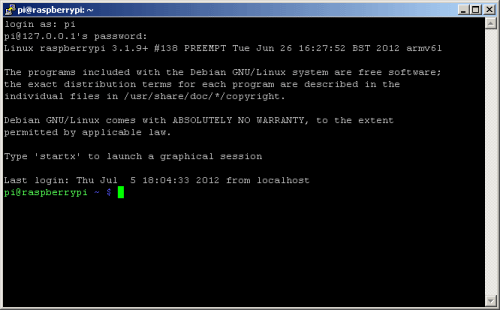
Windows 7 box to write mine. After booting from it, which is as easy as just
inserting the SD card into the Raspberry Pi and plugging in the power, I choose
the menu option to resize the install to my whole SD card. This last step will
take a bit of time depending on the size of your SD card. You will also want to
change the pi account's password on first boot. At this point you should have a
nice little computer that can be used as a drop box. Install whatever you might
normally want on such an item, pretty much if it’s in Debian’s repositories you
can install it with easy (think of the pen-test options). The rest of the
article will focus on the darknet/anonymity aspects. The next step will be to
grab a bunch of packages that will be useful for the following steps. First we
should update all the packages. We can pretty much do this with one command:
------------------------------------ Then we will want to add a few packages:
------------------------------------ Here are the things we are installing, and why: default-jre: Java Runtime. We will need to replace it with the Oracle/Sun
version of Java. Notice we installed less apps on
the Raspberry Pi than on the Pogoplug, this is because most of what I want is
already there on this Debian install. Also, since we can get I2P to work with
the defaule-jre (Java run time environment) we don't need to go though the pain
of using the Oracle embedded version, saving a few steps. Installing I2P Since I2P is the cipherspace we
will be using, we need to install it (duh!).
------------------------------------ 2. Find the URL to download I2P from by going to
http://www.i2p2.de/download, this will
change with time as new versions are released. At the time of this writing the
following works.
------------------------------------ 3. Next, to install I2P use the following command:
------------------------------------ I suppose the -cacao is not needed here, but I'll explain more about it in a
bit. 4. Take all the defaults. I put mine in a directory called just i2pbin. Keep
in mind that i2pbin is the directory where the binaries for I2P are but the
active configs will be in pi’s home under .i2p (note the leading period). 5. Ok, in future releases this step may not be needed. It seems the I2P
installer gets confused by what Debian tells it regarding the CPU version in the
Raspberry Pi. As I understand it, it needs an ARM6 version of the big integer
library, but it unpacks the ARM7 version which will not work (but the ARM 5
will). What we need to do is move the jar that contains that library (and I do
mean move, renaming is not enough) out of the lib folder, unpack it, then copy
the correct library .so file into i2pbin (big thanks to zzz for figuring this
out). We can do that with this set of commands:
------------------------------------ 6. In theory, if we are in Pi’s home we should be able to use the command:
------------------------------------ But I've not played enough with modifying that script yet. Instead I'm just
using runplain.sh, but first we need to change it a bit. Open it up in nano (or
whatever text editor you like):
------------------------------------ Then edit the "JAVAOPTS" line by adding the -cacao option: JAVAOPTS="-cacao
-Djava.net.preferIPv4Stack=${PREFERv4} -Djava.library.path=${I2P}:${I2P}/lib
-Di2p.dir.base=${I2P} -DloggerFilenameOverride=logs/log-router-@.txt" My understanding is that the default Java is purely interpreted byte code,
and is very slow:
------------------------------------ But that Cacao is much faster because it uses JIT (Just In Time) compiling
and executes closer to native code:
------------------------------------ Someone who knows more about Java, feel free to correct me on how this works
exactly, the point is that Cacao should be faster which is why we modify out
runplain.sh. 7. Lets run runplain.sh for the first time, then kill it. We do this to set
up a .i2p profile for use to edit:
------------------------------------ If the kill command above fails, you can try "killall java" but that is less
elegant. I can normally find I2P pretty easily in the process list, just run
"top" and it's near the top in CPU usage. Now we should have the directory
/root/.i2p/ where our configs will be. 8. If you want to you can RDP into the Raspberry Pi and just use I2P from
there. I want to make it a gateway to I2P for my whole LAN, so let’s make it so
we can get into the web console from any box, not just the local host. Edit
~/.i2p/clients.config and look for a line that looks like:
clientApp.0.args=7657 ::1,127.0.0.1 ./webapps/ Comment it out with a # and uncomment the line that looks like: #clientApp.0.args=7657
0.0.0.0 ./webapps/ to:
clientApp.0.args=7657 0.0.0.0 ./webapps/ If we do this step, and we don't trust all of the hosts on our LAN, it is
probably a good idea to make a router password. Just edit .i2p/clients.config
------------------------------------ then add the line: consolePassword=SomePassword Obviously replacing “SomePassword” with the password you want to use. The
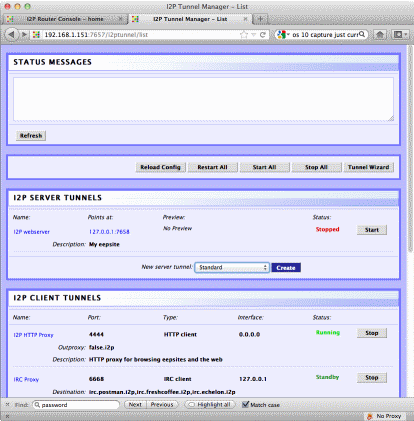
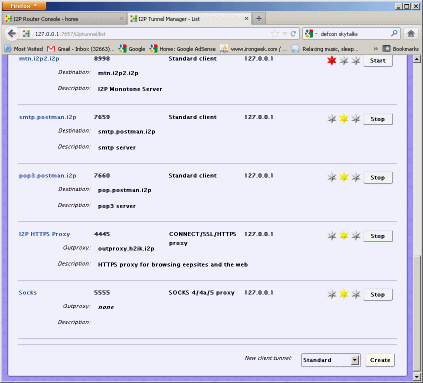
logon name is “admin”. That takes care of giving access to the I2P console, now
to be able to get to the proxies. For this we have to set the proxies on ports
4444 and 4445 to listen on 0.0.0.0. Edit the i2ptunnel.config:
------------------------------------ Find the lines that look like: tunnel.0.interface=127.0.0.1 and set them to be tunnel.0.interface=0.0.0.0 9. We can now start I2P with a simple:
------------------------------------ but what if you want it to start on boot and make sure it’s running at all
times, even after a crash. The following is my solution, but there may be a
better way. Run:
------------------------------------ This should bring up an editor so we can add scheduled tasks. Add the
following lines: 0 * * * * /home/pi/i2pbin/runplain.sh then exit. These lines should start up I2P on boot and try to load it every
hour. The reason for the every hour line is to restart I2P in case it has
crashed. If I2P finds that it is already running, it should graceful close. 10. We should now have I2P up and running now, config you browser to point to
4444 and 4445 for the http and https proxies respectively. Extra I2P Tweaks If too many resources are being taken by routing for others, you may wish to
add:
router.maxParticipatingTunnels=0 to your ~/.i2p/clients.config. Sharing is good for the network, but the the
Raspberry Pi may be a little under powered depending on what you do with it. I'm
still testing this, but so far routing for others does not seem to be causing me
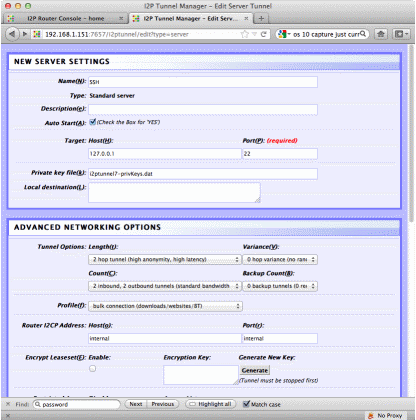
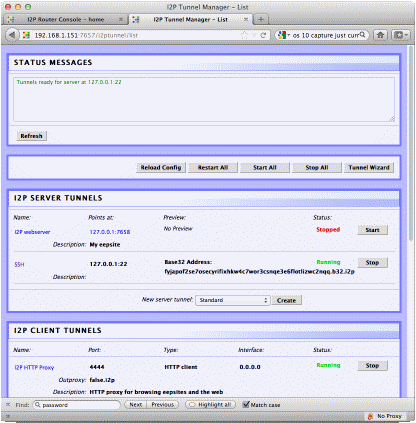
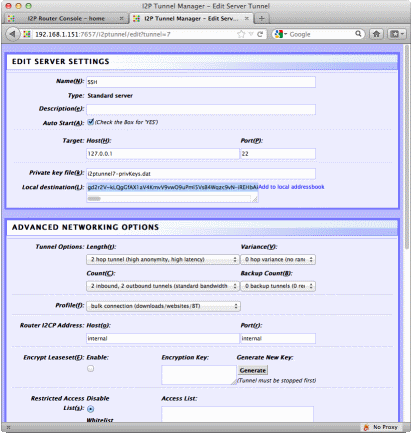
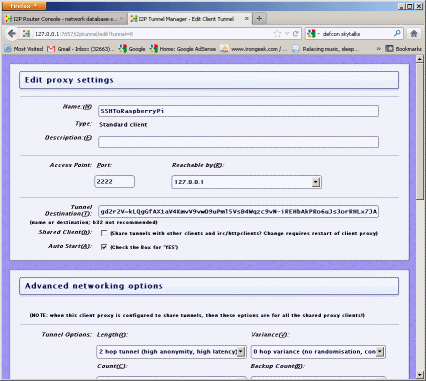
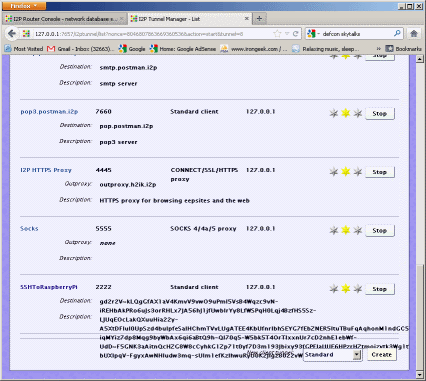
an undue performance hit, and it helps obfuscate my traffic some. Also, to add more sites you you address box you can surf to : http://<Raspberry Pi's IP>:7657/susidns/subscriptions and add: http://www.i2p2.i2p/hosts.txt to the subscription list. Setting up access over the Darknet Of course to make it a working
BlackThrow you would need something more to access it remotely. You could go to
the extreme and use Garlicat (http://www.cypherpunk.at/?p=40
) but for simplicity I’m just using OpenSSH. OpenSSH is already installed,
fairly low bandwidth is required for just remote shell access and you can use
dynamic port forwarding over SSH to make it act as a poor man’s VPN/anonymising
proxy.
Here are a few links that may be useful to you in setting up a svartkast.
15 most recent posts on Irongeek.com:
| ||||
If you would like to republish one of the articles from this site on your
webpage or print journal please contact IronGeek.
Copyright 2020, IronGeek
Louisville / Kentuckiana Information Security Enthusiast